Create a template
Every day you rely heavily on reusing protocols and templates for your research. Labfolder allows you to create, edit and integrate your protocols directly in your electronic lab notebook. You can also even share them with your colleagues or external collaborators.
To create a template for your experiments, simply:
- Select “Templates” from the left-hand navigation menu.
- Choose the folder where you want to save the template, then click “Create Template.”
- Give your template a name and begin adding elements, just as you would with a regular entry.
Incorporate Word files
If you have saved your protocols as Word documents, you can simply insert them into your digital lab notebook and start working immediately. When you upload these Word documents to your ELN, it is able to recognize the content of the document (text, tables, images) and extract it into the appropriate input element.
- Upload your Word file of interest.
- Hover over the element and click on the extract icon that appears at the top-right corner.
Use Data Elements
By offering a common structure for the specification of physical quantities, Labfolder’s Data Elements help you to organize your experimental parameters. Together with the option of linking to the inventory (Labregister) this provides a perfect tool for structuring data in a common way and can increase reproducibility. You can find the icon for data elements in the entry header toolbar. Here, you can list different parameters by using:
• a Numerical Data Element for physical quantities and units;
• a Descriptive Data Element for any qualitative data;
• a Data Group in order to cluster different experimental parameters;
• Labregister items that refer to items collected in your inventory database.
Numerical Data Element
- Click on the Data Elements icon and select + Numerical DE
- Add a Data Element by specifying:
◦ Data element name;
◦ Physical quantity (mandatory);
◦ Amount;
◦ Units (Note – If you save the numerical data element without a value, it will appear as a placeholder that can be filled in later.) - By clicking the Save icon in the top right corner, your data entry will be saved and close automatically.
Descriptive Data Element
- Click on the Data Elements icon and select + Descriptive DE
- Add a Data Element by specifying:
◦ Data element name (mandatory);
◦ Data element description. - By clicking the Save icon in the top right corner, your data entry will be saved and close automatically.
Data Group
- Click on the Data Elements icon and select + Data Group.
- Add a name to the data element group (e.g. PCR).
- Now you can add more data elements to the group by dragging existing elements or clicking the + icon next to the group name.
- By clicking the Save icon in the top right corner, your data entry will be saved and close automatically.
Use a template
According to the rules of Good Laboratory Practices (GLP), you must either rewrite a protocol each time you use it or name the page on which it was first described. This takes a lot of time when it is done on paper, but thanks to Labfolder it is now easy. To insert the required template, go back to your notebook.
- Click on the Use entry template.
- Select the desired template from your templates folders.
- Click the Use Template button and off you go!
Update a template
In research, protocols are always being changed and optimized. With Labfolder, you can alter your templates whenever you want and they will be automatically updated for your entire team. No more will you accidentally use a protocol that is outdated or contains incorrect information. You can make changes to the template, safe in the knowledge that previous entries using the template will not be affected.
- Go to Templates.
- Select the template you want to make changes to.
- Simply edit it as you would do with an entry.
- Click the Save icon in the top right corner and your changes will be saved.
Reuse entries
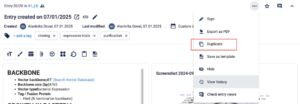
Imagine you want to repeat an experiment that you have documented in your ELN. This can easily be done using the Duplicate Entry option in the item’s menu. This will replicate the entry. You can then edit it and change all the values in it to the data of your new experiments.

- Open an entry and click on the three dots icon in the upper right corner.
- Select Duplicate Entry from the drop-down menu.
- Scroll down to the bottom of the page, you will see an almost identical entry, only the creation date is different.